How to Screenshot on Mac (2026 Guide): Complete Methods & Tips
Learn how to screenshot on Mac with keyboard shortcuts, tools & editing options. Complete 2026 guide for beginners with pro tips & troubleshooting.


Taking screenshots on Mac is an essential skill every user should master, whether you're documenting technical issues, vibe coding with Claude code, sharing content with colleagues, or creating tutorials for your UAE-based business. With macOS continuing to evolve in 2026, Apple has refined and expanded screenshot capabilities, making them more powerful and user-friendly than ever before.
Mac offers multiple ways to capture your screen, from simple keyboard shortcuts to advanced built-in tools that rival professional screenshot software. Unlike Windows PCs, Mac's screenshot system is deeply integrated into the operating system, providing seamless functionality across all applications. This comprehensive guide will walk you through every available method, so you can capture exactly what you need when you need it, regardless of your level of technical expertise.
1. Master the Basic Screenshot Keyboard Shortcuts
The fastest way to take screenshots on Mac involves memorising three essential keyboard combinations. These shortcuts work across all Mac models sold in the UAE, from the latest MacBook Air (starting at around AED 4,999) to the high-end Mac Studio, provided a compatible keyboard is used.
For a full-screen capture, press Command (⌘) + Shift + 3 simultaneously. Your Mac will instantly capture everything visible on your screen and save it as a PNG file to your desktop. You'll hear a camera shutter sound (unless your Mac is muted), and a thumbnail preview will appear in the bottom-right corner for five seconds.
To capture a specific portion of your screen, use Command (⌘) + Shift + 4. This transforms your cursor into crosshairs, allowing you to click and drag to select any rectangular area. Release the mouse button or trackpad to capture the selected region. This method is particularly useful for capturing specific windows, dialog boxes, or sections of web pages.
For window-specific screenshots, press Command (⌘) + Shift + 4, then press the Spacebar. Your cursor changes to a camera icon, and you can click on any window to capture it with a subtle drop shadow effect. This method automatically captures the entire window, even if parts are obscured by other windows.
Tip: Hold the Option key while using Command + Shift + 4 + Spacebar to capture a window without the drop shadow, creating cleaner images for professional presentations.
Warning: Some secure applications like banking websites or streaming services may block screenshots for security reasons, resulting in black or blank captures.
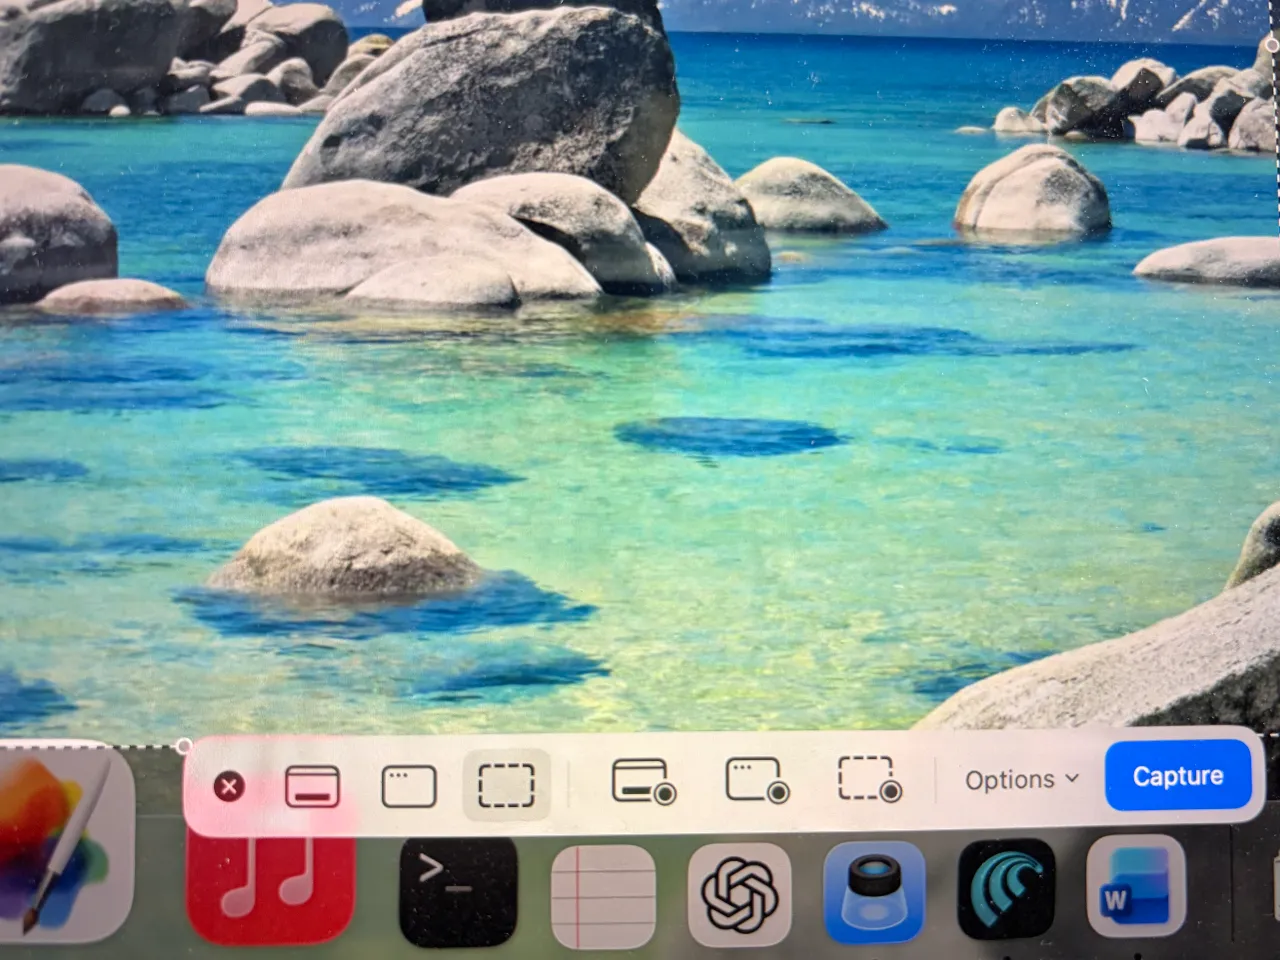
2. Use the Screenshot Toolbar for Advanced Options
macOS includes a powerful screenshot toolbar accessed by pressing Command (⌘) + Shift + 5. This comprehensive tool provides all screenshot and screen recording options in one convenient interface.
The toolbar displays five capture options: capture entire screen, capture selected window, capture selected portion, record entire screen, and record selected portion. Below these options, you'll find the Options menu, which controls where screenshots are saved, whether to include the pointer in captures, and timing options.
Click 'Options' to access advanced settings. You can change the save location from the default desktop to Documents, Clipboard, or any custom folder. This is particularly useful for professionals who need to organise screenshots by project or client. The timer option allows delays of 5 or 10 seconds, perfect for capturing menus or tooltips that disappear when you press keys.
The 'Show Floating Thumbnail' option, enabled by default, displays a preview of your screenshot in the bottom-right corner. Click this thumbnail to quickly edit, share, or delete the screenshot without opening additional applications.
Tip: Set up a dedicated Screenshots folder in your Documents to keep captures organized. You can create folders for different projects or clients to streamline your workflow.
Warning: Screen recording captures audio by default. Ensure you're not inadvertently recording sensitive conversations or copyrighted material when using the record functions.
3. Edit Screenshots with Built-in Markup Tools
Mac's built-in Markup tools have evolved significantly by 2026, offering professional-grade editing capabilities without requiring third-party software. When you take a screenshot, click the floating thumbnail that appears to access these tools immediately.
The Markup toolbar includes essential editing tools: text insertion, arrow drawing, highlighting, magnification, and shape creation. The text tool allows you to add annotations in various fonts, sizes, and colours – perfect for creating instructional materials or marking up documents for UAE business presentations.
Arrows and shapes can be customised with different colours and line weights. The highlight tool works like a digital marker, perfect for emphasising important information in screenshots. The magnification tool creates a circular zoom effect, ideal for highlighting small interface elements or text that might be difficult to see.
For more advanced editing, click the 'More' button (three dots) to access additional tools, including signature insertion, rotation, and cropping. These tools rival many paid screenshot applications available in UAE software retailers, making expensive alternatives unnecessary for most users.
Tip: Use consistent colors and fonts across your screenshots to maintain professional branding, especially important for UAE businesses creating customer support materials or training documents.
Warning: Markup edits are permanent once saved. Always keep backup copies of original screenshots if you might need unedited versions later.
4. Customise Screenshot Settings and File Management
Effective screenshot management becomes crucial for power users, especially in the UAE's growing tech sector, where documentation and visual communication are essential. macOS 2026 offers extensive customisation options for screenshot behaviour and file organisation.
Open System Settings and navigate to Desktop & Dock, then scroll to the Screenshots section. Here you can modify default save locations, file formats (PNG, JPEG, or PDF), and naming conventions. For professional environments, consider changing the default location from Desktop to a dedicated folder structure.
The default PNG format provides the best quality but creates larger files. JPEG offers smaller file sizes with a slight reduction in quality, suitable for email sharing or web publishing. PDF format is ideal for multi-page captures or when maintaining vector graphics quality is important.
File naming can be customised to include timestamps, application names, or custom prefixes. This is particularly valuable for UAE businesses that need to maintain organised documentation for compliance or client communication purposes. You can also disable the sound effect if you frequently take screenshots in quiet environments, such as libraries or meeting rooms.
Tip: Create a naming convention that includes project codes or client names to make screenshots easily searchable. For example, 'ClientABC_Interface_2026-03-15_001.png'.
Warning: Be mindful of file sizes when changing formats. PNG files can become quite large for full-screen captures, potentially filling up storage on entry-level MacBook Air models with 256GB storage.
5. Troubleshoot Common Screenshot Issues
Even with Mac's refined screenshot system, users occasionally encounter issues that require troubleshooting. Understanding common problems and solutions ensures consistent screenshot functionality across your workflow.
If keyboard shortcuts stop working, first check if any applications have hijacked these key combinations. Some software popular in the UAE market, particularly productivity tools or remote desktop applications, may override Mac's default shortcuts. Navigate to System Settings > Keyboard > Keyboard Shortcuts > Screenshots to verify and restore default combinations.
Permission issues can prevent screenshots in certain applications or system areas. macOS security features, enhanced in 2026, require explicit permission to use screen recording. If screenshots appear black or fail entirely, check System Settings > Privacy & Security > Screen Recording to ensure that the relevant applications have the proper permissions.
Storage limitations can cause screenshot failures without obvious error messages. Mac requires sufficient free space to create temporary files during the capture process. Ensure at least 1GB of free space remains available; this is particularly important for users with base-model MacBooks that might have limited storage.
For persistent issues, resetting screenshot preferences often resolves mysterious problems. Delete the file '~/Library/Preferences/com.apple.screencapture.plist' and restart your Mac to restore default screenshot behavior.
Tip: Create a simple test routine: take a screenshot, edit it with Markup, and save to a custom location. This quick test can identify issues before important presentations or documentation sessions.
Warning: Never delete system preference files unless you understand the consequences. Always backup important data before making system-level changes to your Mac configuration.
Frequently Asked Questions
Can I take screenshots of streaming videos on a Mac?
Most streaming services, such as Netflix, Amazon Prime Video, and OSN, implement copy protection that prevents screenshots, resulting in black screens. However, you can take a screenshot of the interface elements around the video player. Some educational platforms and business applications may allow screenshots depending on their content protection policies.
Where are my screenshots saved by default, and how can I change this location?
Screenshots are saved to your Desktop by default with names like 'Screenshot 2026-03-15 at 10.30.45 AM.png'. To change this, use Command + Shift + 5, click Options, and select a new location. You can also use Terminal commands to set custom locations, which is useful for businesses that need organised file structures for client work.
Why are my screenshot files so large, and how can I reduce their size?
Mac screenshots default to PNG format for maximum quality, but full-screen captures on high-resolution displays can be 2-10 MB. Change the screenshot format to JPEG for smaller files, or use the built-in Preview app to compress existing screenshots. For regular sharing via email or WhatsApp, JPEG format typically provides the best balance of quality and file size.
Can I schedule automatic screenshots on my Mac?
While Mac doesn't have built-in scheduled screenshots, you can create automations using the Shortcuts app or Automator. For business monitoring or time-tracking purposes common in freelance work, third-party applications like CleanMyMac offer scheduling features.
How do I take screenshots of the Touch Bar on older MacBook Pro models?
Press Command + Shift + 6 to capture the Touch Bar content. This creates a separate image file showing only the Touch Bar interface. While newer MacBook Pro models no longer include Touch Bars, many professionals still use older models with this feature for specialised workflows.
Wrapping Up
Mastering Mac screenshots lets you communicate more effectively, whether you're documenting technical issues for IT support, creating training materials for your team, or simply sharing interesting content with friends.
The combination of intuitive keyboard shortcuts, powerful built-in editing tools, and extensive customisation options makes Mac's screenshot system one of the most comprehensive available on any platform. Practice these techniques regularly to build muscle memory, and don't hesitate to experiment with different methods to find what works best for your specific workflow and requirements.
Written by

Subscribe to our newsletter
Subscribe to our newsletter to get the latest updates and news


Member discussion